搜索到
1
篇与
的结果
-
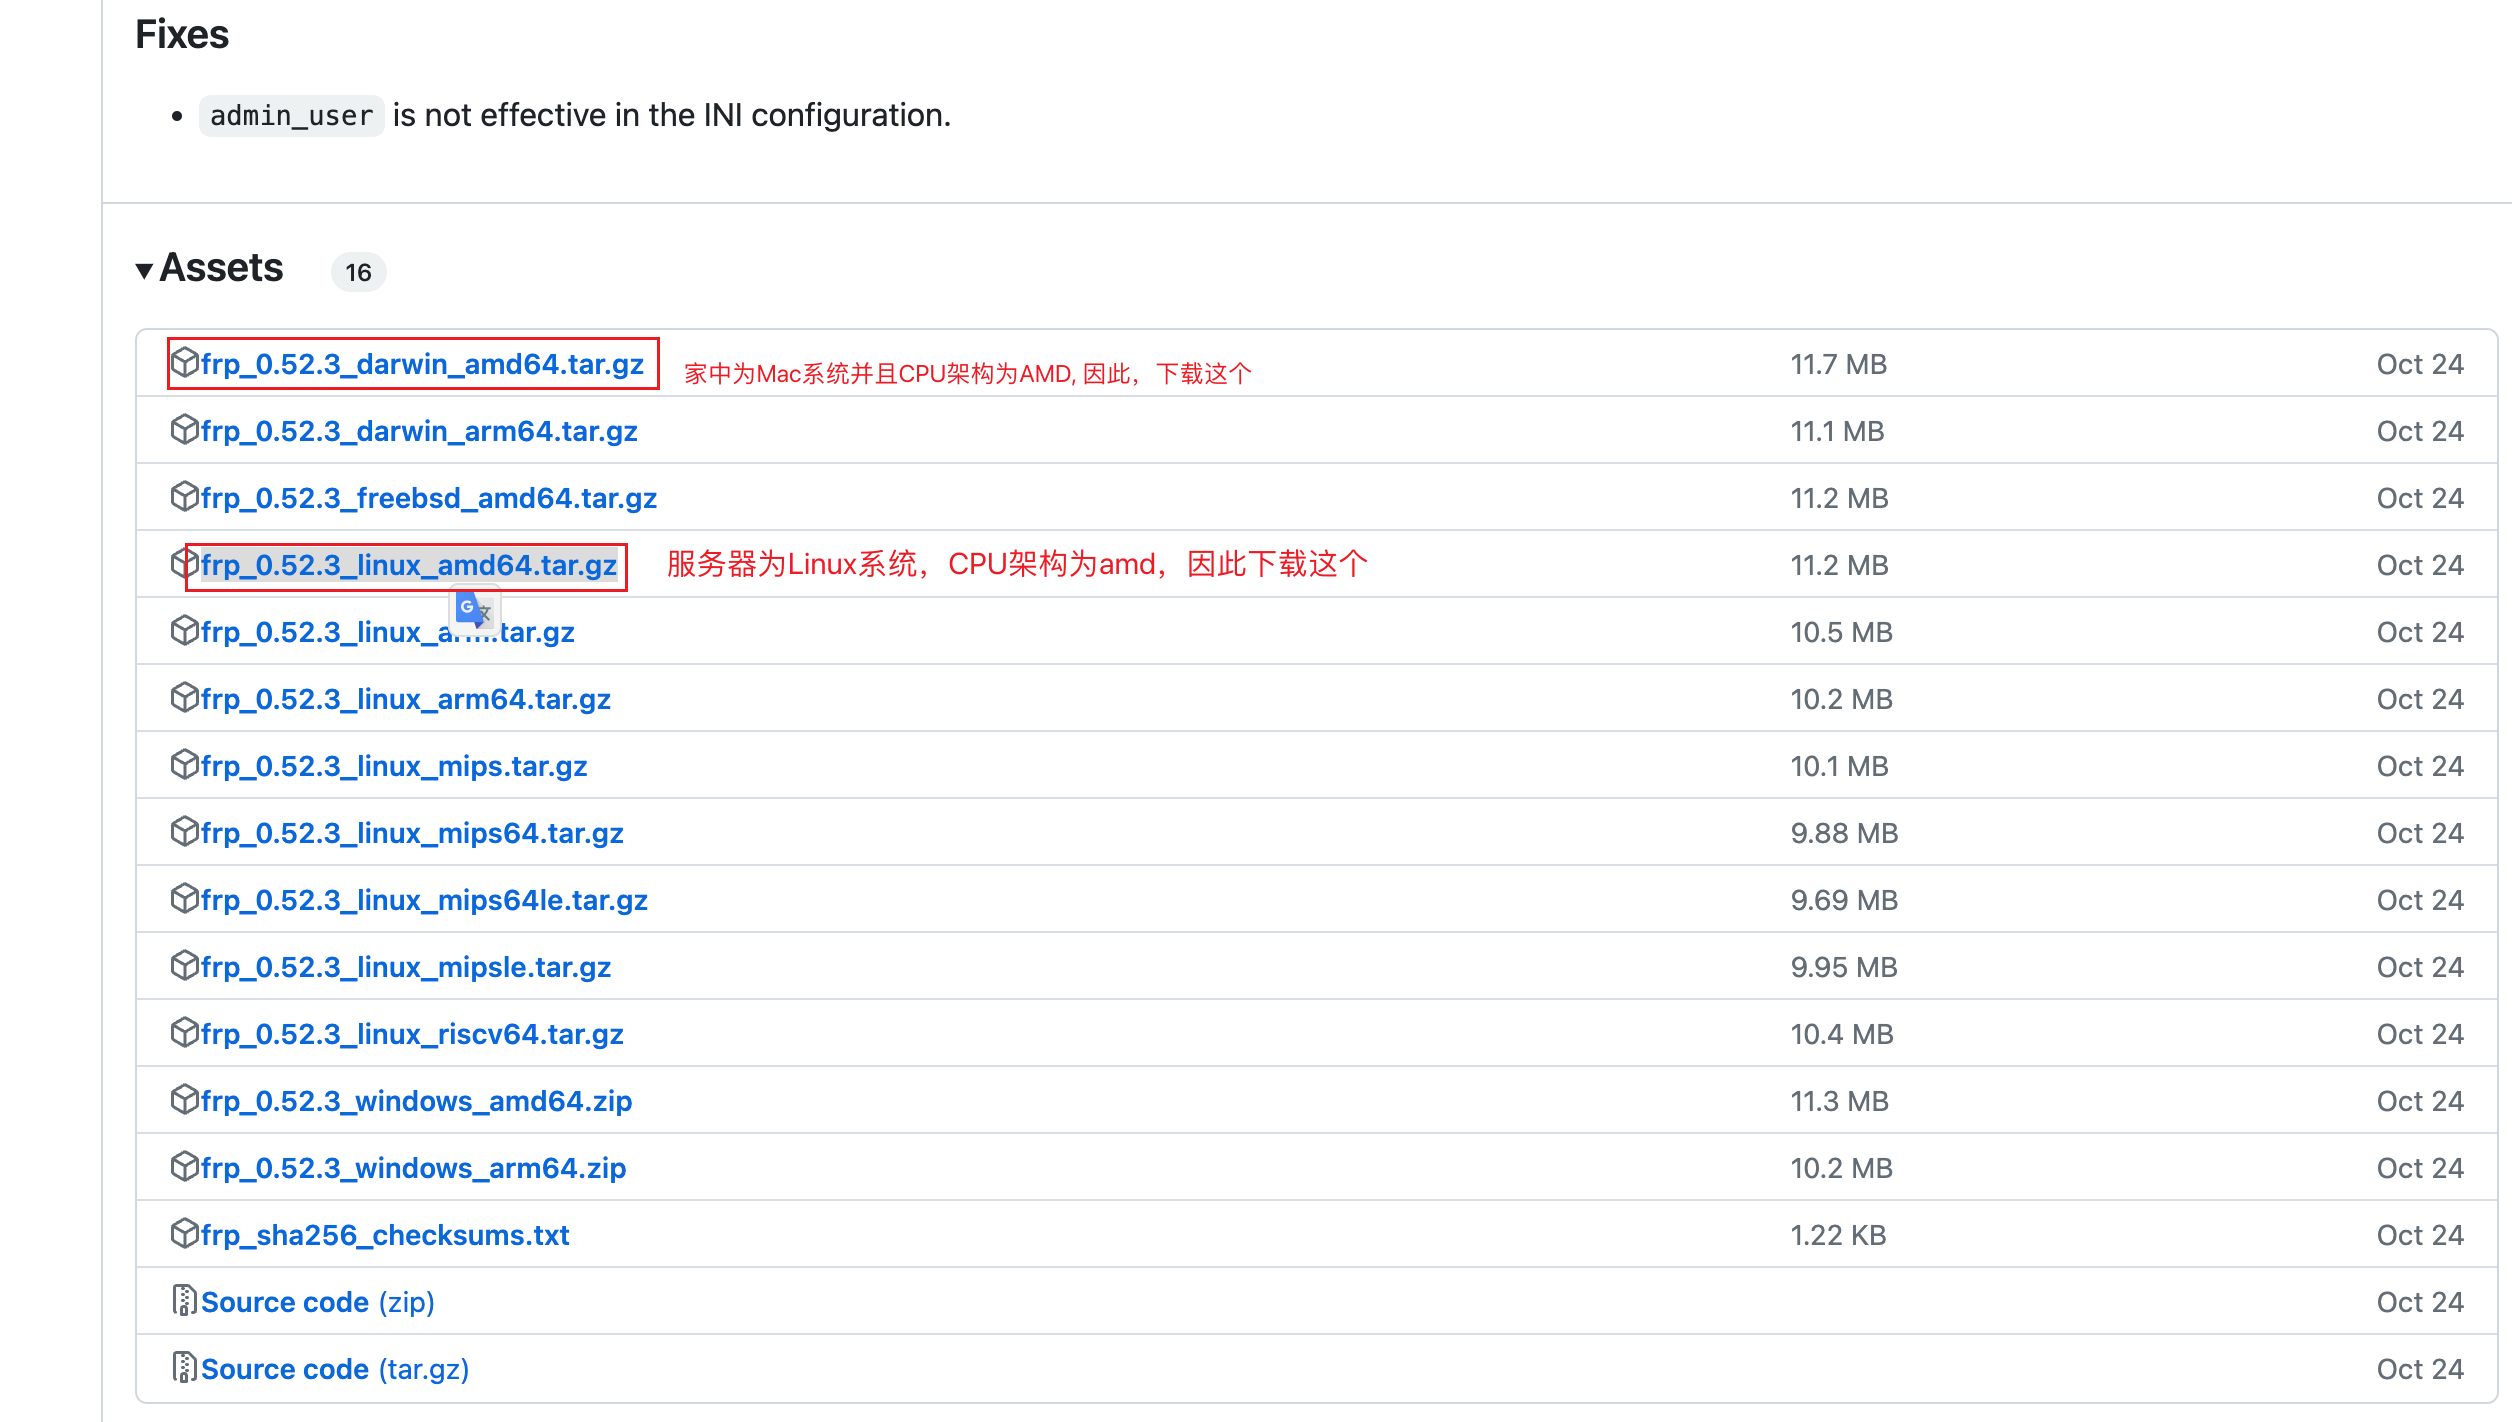
 使用frp进行内网穿透,实现远程ssh连接内网主机 需求 我想在公司的网络环境中连接到家里主机进行远程操作。 目前的解决方案: 远程控制软件: TeamViewer 向日葵 QQ 等等... 内网穿透工具 frp (前提:需要一台具有公网IP的主机) ... 但是,由于我的需求只是需要远程SSH到家里的主机,进行控制台操作,基本不涉及到图形化界面,因此,这里我选择frp内网穿透(前提: 我目前已经有一台能够具有公网ip的阿里云服务器), 顺便说一下, 现在阿里云云主机(99元一年,新老客户都可以): https://www.aliyun.com/minisite/goods?userCode=ej7w2qnx。 frp简介 通过在具有公网 IP 的节点上部署 frp 服务端,您可以轻松地将内网服务穿透到公网,并享受以下专业特性: 多种协议支持:客户端服务端通信支持 TCP、QUIC、KCP 和 Websocket 等多种协议。 TCP 连接流式复用:在单个连接上承载多个请求,减少连接建立时间,降低请求延迟。 代理组间的负载均衡。 端口复用:多个服务可以通过同一个服务端端口暴露。 P2P 通信:流量不必经过服务器中转,充分利用带宽资源。 客户端插件:提供多个原生支持的客户端插件,如静态文件查看、- -HTTPS/HTTP 协议转换、HTTP、SOCKS5 代理等,以便满足各种需求。 服务端插件系统:高度可扩展的服务端插件系统,便于根据自身需求进行功能扩展。 用户友好的 UI 页面:提供服务端和客户端的用户界面,使配置和监控变得更加方便。 下面是frp一些相关链接: GitHub项目地址(Go语言实现): https://github.com/fatedier/frp 文档地址: https://gofrp.org/zh-cn/docs/overview/ 实例配置: https://gofrp.org/zh-cn/docs/examples/ssh/ frp安装 frp是使用Go语言编写,支持跨平台的。 因此,只需要在具有公网IP的服务端下载软件和家里主机上下载进行简单配置即可。 目前(2023年11月26日13:01:37), 最新版本为: v0.52.3, 因此我们使用这个版本。 注意: 服务器和家里主机的版本最好一致。 下载地址: https://github.com/fatedier/frp/releases/tag/v0.52.3 如果下载比较缓慢,请开启VPN进行下载。 公网服务器安装fpr 解压安装包[root@iZ2zeb2i87ctar29rg4v28Z frp]# pwd /root/frp [root@iZ2zeb2i87ctar29rg4v28Z frp]# ll 总用量 11508 -rw-r--r-- 1 root root 11781267 11月 26 13:20 frp_0.52.3_linux_amd64.tar.gz [root@iZ2zeb2i87ctar29rg4v28Z frp]# tar -zxvf frp_0.52.3_linux_amd64.tar.gz frp_0.52.3_linux_amd64/ frp_0.52.3_linux_amd64/LICENSE frp_0.52.3_linux_amd64/frps.toml frp_0.52.3_linux_amd64/frpc frp_0.52.3_linux_amd64/frpc.toml frp_0.52.3_linux_amd64/frps [root@iZ2zeb2i87ctar29rg4v28Z frp]# ll 总用量 11512 drwxr-xr-x 2 1001 docker 4096 10月 24 10:57 frp_0.52.3_linux_amd64 -rw-r--r-- 1 root root 11781267 11月 26 13:20 frp_0.52.3_linux_amd64.tar.gz [root@iZ2zeb2i87ctar29rg4v28Z frp]# 配置 这里不需要配置, 只是看一下frps.toml文件中默认绑定的端口为: 7000即可。 [root@iZ2zeb2i87ctar29rg4v28Z frp]# ls frp_0.52.3_linux_amd64 frp_0.52.3_linux_amd64.tar.gz [root@iZ2zeb2i87ctar29rg4v28Z frp]# cd frp_0.52.3_linux_amd64/ [root@iZ2zeb2i87ctar29rg4v28Z frp_0.52.3_linux_amd64]# ls frpc frpc.toml frps frps.toml LICENSE [root@iZ2zeb2i87ctar29rg4v28Z frp_0.52.3_linux_amd64]# cat frps.toml bindPort = 7000 [root@iZ2zeb2i87ctar29rg4v28Z frp_0.52.3_linux_amd64]# 使用Systemd管理frp 注意:将/root/frp/frp_0.52.3_linux_amd64 替换成你的目录。 sudo cat > /etc/systemd/system/frps.service << EOF [Unit] # 服务名称 Description = frp server After = network.target syslog.target Wants = network.target [Service] Type = simple # 启动frps的命令 ExecStart = /root/frp/frp_0.52.3_linux_amd64/frps -c /root/frp/frp_0.52.3_linux_amd64/frps.toml [Install] WantedBy = multi-user.target EOF 执行过程: [root@iZ2zeb2i87ctar29rg4v28Z frp_0.52.3_linux_amd64]# sudo cat > /etc/systemd/system/frps.service << EOF > [Unit] > # 服务名称 > Description = frp server > After = network.target syslog.target > Wants = network.target > > [Service] > Type = simple > # 启动frps的命令 > ExecStart = /root/frp/frp_0.52.3_linux_amd64/frps -c /root/frp/frp_0.52.3_linux_amd64/frps.toml > > [Install] > WantedBy = multi-user.target > EOF [root@iZ2zeb2i87ctar29rg4v28Z frp_0.52.3_linux_amd64]# cat /etc/systemd/system/frps.service [Unit] # 服务名称 Description = frp server After = network.target syslog.target Wants = network.target [Service] Type = simple # 启动frps的命令 ExecStart = /root/frp/frp_0.52.3_linux_amd64/frps -c /root/frp/frp_0.52.3_linux_amd64/frps.toml [Install] WantedBy = multi-user.target [root@iZ2zeb2i87ctar29rg4v28Z frp_0.52.3_linux_amd64]# 启动frp [root@iZ2zeb2i87ctar29rg4v28Z frp_0.52.3_linux_amd64]# sudo systemctl start frps [root@iZ2zeb2i87ctar29rg4v28Z frp_0.52.3_linux_amd64]# sudo systemctl status frps ● frps.service - frp server Loaded: loaded (/etc/systemd/system/frps.service; disabled; vendor preset: enabled) Active: active (running) since Sun 2023-11-26 13:32:30 CST; 10s ago Main PID: 93946 (frps) Tasks: 5 (limit: 11849) Memory: 8.7M CGroup: /system.slice/frps.service └─93946 /root/frp/frp_0.52.3_linux_amd64/frps -c /root/frp/frp_0.52.3_linux_amd64/frps.toml 11月 26 13:32:30 iZ2zeb2i87ctar29rg4v28Z systemd[1]: Started frp server. 11月 26 13:32:30 iZ2zeb2i87ctar29rg4v28Z frps[93946]: 2023/11/26 13:32:30 [I] [root.go:102] frps uses config file: /root/frp/frp_0.52.3_linux_amd64/frps.toml 11月 26 13:32:30 iZ2zeb2i87ctar29rg4v28Z frps[93946]: 2023/11/26 13:32:30 [I] [service.go:200] frps tcp listen on 0.0.0.0:7000 11月 26 13:32:30 iZ2zeb2i87ctar29rg4v28Z frps[93946]: 2023/11/26 13:32:30 [I] [root.go:111] frps started successfully [root@iZ2zeb2i87ctar29rg4v28Z frp_0.52.3_linux_amd64]# 开启开机启动 [root@iZ2zeb2i87ctar29rg4v28Z frp_0.52.3_linux_amd64]# sudo systemctl enable frps Created symlink /etc/systemd/system/multi-user.target.wants/frps.service → /etc/systemd/system/frps.service. [root@iZ2zeb2i87ctar29rg4v28Z frp_0.52.3_linux_amd64]# 配置云主机放开: 7000和6000端口 (略) 家里主机安装fpr 解压安装包 localhost:Documents zxy$ ls frp_0.52.3_darwin_amd64.tar.gz localhost:Documents zxy$ tar -xf frp_0.52.3_darwin_amd64.tar.gz localhost:Documents zxy$ ls frp_0.52.3_darwin_amd64.tar.gz frp_0.52.3_darwin_amd64 localhost:Documents zxy$ cd frp_0.52.3_darwin_amd64 localhost:frp_0.52.3_darwin_amd64 zxy$ ls LICENSE frpc frpc.toml frps frps.toml localhost:frp_0.52.3_darwin_amd64 zxy$ 配置 编辑 frpc.toml 文件,假设 frps 所在服务器的公网 IP 地址为 x.x.x.x。以下是示例配置: sudo cat > /Users/zxy/Documents/frp_0.52.3_darwin_amd64/frpc.toml << EOF serverAddr = "x.x.x.x" serverPort = 7000 [[proxies]] name = "ssh" type = "tcp" localIP = "127.0.0.1" localPort = 22 remotePort = 6000 EOF serverAddr frp服务端公网IP。 serverPort frp服务端端口。 localIP 和 localPort 配置为需要从公网访问的内网服务的地址和端口。 remotePort 表示在 frp 服务端监听的端口,访问此端口的流量将被转发到本地服务的相应端口。 启动 命令: ./frpc -c frpc.toml 过程: localhost:frp_0.52.3_darwin_amd64 zxy$ ./frpc -c frpc.toml 2023/11/26 13:48:29 [I] [root.go:139] start frpc service for config file [frpc.toml] 2023/11/26 13:48:29 [I] [service.go:299] [3d90255be67b269a] login to server success, get run id [3d90255be67b269a] 2023/11/26 13:48:29 [I] [proxy_manager.go:156] [3d90255be67b269a] proxy added: [ssh] 2023/11/26 13:48:29 [I] [control.go:173] [3d90255be67b269a] [ssh] start proxy success 家里电脑(MacOS)开启SSH访问 系统偏好设置 -> 共享 -> 勾选 远程登录 验证是否可以远程SSH连接 使用以下命令通过 SSH 访问内网机器,假设用户名为 test: ssh -o Port=6000 test@x.x.x.x frp 将请求发送到 x.x.x.x:6000 的流量转发到内网机器的 22 端口。 总结 到此,就可以完成远程ssh访问了。